
![]()
MySQL is a relational database server with a great reputation for being fast, efficient, safe, stable, easy to use, multiplatform (GNU/Linux, * BSD, Windows,…) and well documented. The current MySQL development process is under Oracle's umbrella but the community version is released as free software and you can use under GPL terms.
MySQL 5.7 improves security and performance over previous versions, also introduces the JSON data type, allowing to store non relational data. For all MySQL changes see: What Is New in MySQL 5.7.
MySQL 5.7 is not available in the official CentOS repositories, it has been replaced by MariaDB: a fork of MySQL, MariaDB share features with MySQL but has a different development model and community.
MySQL 5.7 can be downloaded from the MySQL download site, however it is recommended to download the repository definition to keep updated with improvements and bug fixes.
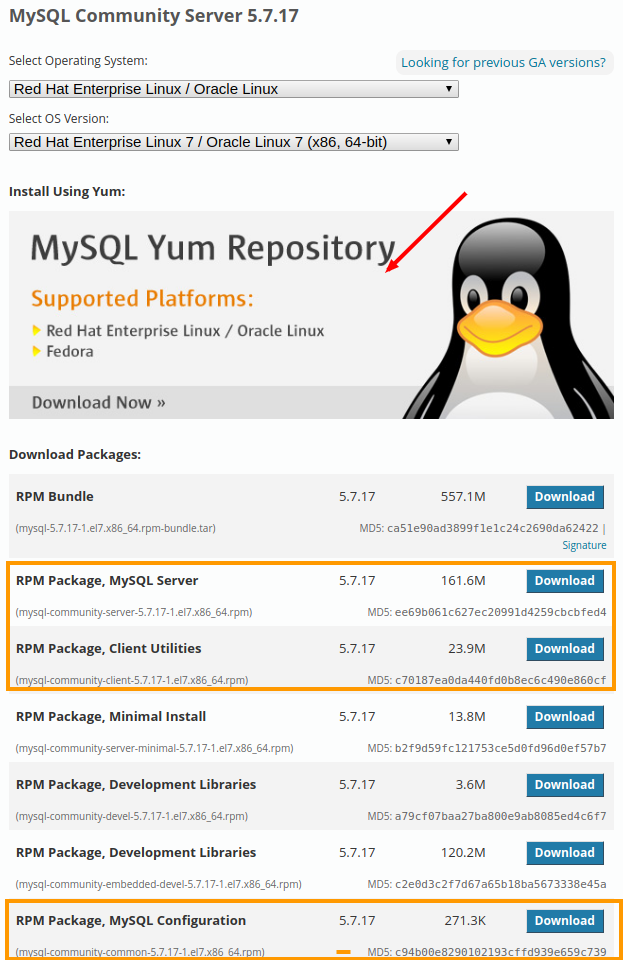
The following figure shows the options you should choose for CentOS 7, the red arrow indicates where you must click to download the repository definition, the orange boxes indicate the packages you should download if you do not want to use the MySQL repository.
Download repository definition
Once you clicked on the red arrow the following options will be shown, the red box indicates the package you should download.

You can also download the package by typing the following command (if wget is not installed you can install it by running sudo yum -y install wget):
$ wget https://dev.mysql.com/get/mysql57-community-release-el7-9.noarch.rpm
Install repository definition
Once you've downloaded the definition of repository you can install it by typing:
$ sudo rpm -ivh mysql57-community-release-el7-9.noarch.rpm
Update
Before installing MySQL, it is recommended to upgrade the OS typing:
$ sudo yum update
If a new version of the kernel has been installed then reboot the OS with:
$ sudo reboot
Install MySQL
When you install the mysql-community-server package all dependencies and tools required to run and manage the MySQL server will be installed.
$ sudo yum install mysql-community-server
Check MySQL status
Once you've installed MySQL check if the MySQL service is runnin using systemd (systemd is a replacement for SysV system initialization is also a suite of service management and configurations for the GNU / Linux operating system) as shown in the message MySQL service is stopped, note Active: inactive (dead) line.
$ sudo systemctl status mysqld
● mysqld.service - MySQL Server
   Loaded: loaded (/usr/lib/systemd/system/mysqld.service; enabled; vendor preset: disabled)
   Active: inactive (dead)
     Docs: man:mysqld(8)
           http://dev.mysql.com/doc/refman/en/using-systemd.html
Start MySQL service
After starting the MySQL server it will be ready to handle DB connections.
$ sudo systemctl start mysqld
When the service is started the MySQL server MySQL generates a temporary password, to know which is the password, type the following command:
$grep -i password /var/log/mysqld.log
...A temporary password is generated for root@localhost: Zxdo1jb5&fTy
Check MySQL status
Again we check the status of the MySQL service, note Active: active (running) line
$ sudo systemctl status mysqld
● mysqld.service - MySQL Server
   Loaded: loaded (/usr/lib/systemd/system/mysqld.service; enabled; vendor preset: disabled)
   Active: active (running) since Tue 2017-03-21 17:17:30 UTC; 52s ago
     Docs: man:mysqld(8)
           http://dev.mysql.com/doc/refman/en/using-systemd.html
  Process: 2929 ExecStart=/usr/sbin/mysqld --daemonize --pid-file=/var/run/mysqld/mysqld.pid $MYSQLD_OPTS (code=exited, status=0/SUCCESS)
  Process: 2853 ExecStartPre=/usr/bin/mysqld_pre_systemd (code=exited, status=0/SUCCESS)
 Main PID: 2931 (mysqld)
   CGroup: /system.slice/mysqld.service
           └─2931 /usr/sbin/mysqld --daemonize --pid-file=/var/run/mysqld/mysqld.pid
Automatic start
With the following command you guarantee that the MySQL service is started together with the OS
$ sudo systemctl enable mysqld
You can check if MySQL service starts with the OS running:
$ sudo systemctl is-enabled mysqld
enabled
To disable the MySQL service starts with the OS type:
$ sudo systemctl disable mysqld
Basic MySQL security step
After running the above steps we must ensure a basic security, to do this, run the script (when the script asks the "password for root" you should use the temporary password generated by the MySQL Server):
$ mysql_secure_installation
Securing the MySQL server deployment.

Enter password for user root:

The existing password for the user account root has expired. Please set a new password.

New password:

Re-enter new password:
 ... Failed! Error: Your password does not satisfy the current policy requirements

New password:

Re-enter new password:
The 'validate_password' plugin is installed on the server.
The subsequent steps will run with the existing configuration
of the plugin.
Using existing password for root.

Estimated strength of the password: 100
Change the password for root ? ((Press y|Y for Yes, any other key for No) : n

 ... skipping.
By default, a MySQL installation has an anonymous user,
allowing anyone to log into MySQL without having to have
a user account created for them. This is intended only for
testing, and to make the installation go a bit smoother.
You should remove them before moving into a production
environment.

Remove anonymous users? (Press y|Y for Yes, any other key for No) : y

Normally, root should only be allowed to connect from
'localhost'. This ensures that someone cannot guess at
the root password from the network.

Disallow root login remotely? (Press y|Y for Yes, any other key for No) : y
Success.

By default, MySQL comes with a database named 'test' that
anyone can access. This is also intended only for testing,
and should be removed before moving into a production
environment.

Remove test database and access to it? (Press y|Y for Yes, any other key for No) : y
 - Dropping test database...
Success.

 - Removing privileges on test database...
Success.

Reloading the privilege tables will ensure that all changes
made so far will take effect immediately.

Reload privilege tables now? (Press y|Y for Yes, any other key for No) : y
Success.

All done!
Now we can connect to the MySQL server using the new password:
$ mysql -u root -p
The main configuration of the MySQL server can be found in /etc/my.cnf and extra configuration under: /etc/my.cnf.d/
Spanish Video associated

Administering MySQL from the command line, 1 (15)
- How to install MySQL 5.7 on CentOS 7
- How to install MySQL 8.0 in Ubuntu 20.04
- How to install MySQL 8.0 in Debian
- How to install MariaDB on Alpine Linux
- How to install MariaDB on NetBSD?
- MySQL 8.0, change root password
- MySQL server administration – Basic
- Create / modify / delete tables in MySQL
- MySQL user administration
- MySQL – Execute SQL script
- Disable innodb engine in MySQL
- Show MySQL storage engines
- Character set available in MySQL
- Connect to a MySQL server from the LAN
- MySQL can not write in the /tmp dir